A simple SwiftUI view router
I’ve been playing around with SwiftUI and Combine lately, and had that chance to write my first production ready app a while back. The app had an onboarding process consisting of several views pushed to a NavigationView. After finishing the onboarding, we wanted to show switch to a home view, which would be the basis of operation from the on out.
So, a naïve first approach to this would be to push the home view onto the navigation view stack used in the onboarding, and just hide the back button and disable the swipe right gesture. Sure, it would work, but disregarding the issue with not freeing up the memory of the views from the onboarding, we’d still need a way to be able to show the home view the next time the app launched.
So, in this tutorial, I’ll show you how to build a small view router that in addition to cleaning up the view stack, also will persist the route between launches. If you’re deploying to iOS 14 this will be a short tutorial. If you’re still need to support iOS 13, there’s slightly more work involved.
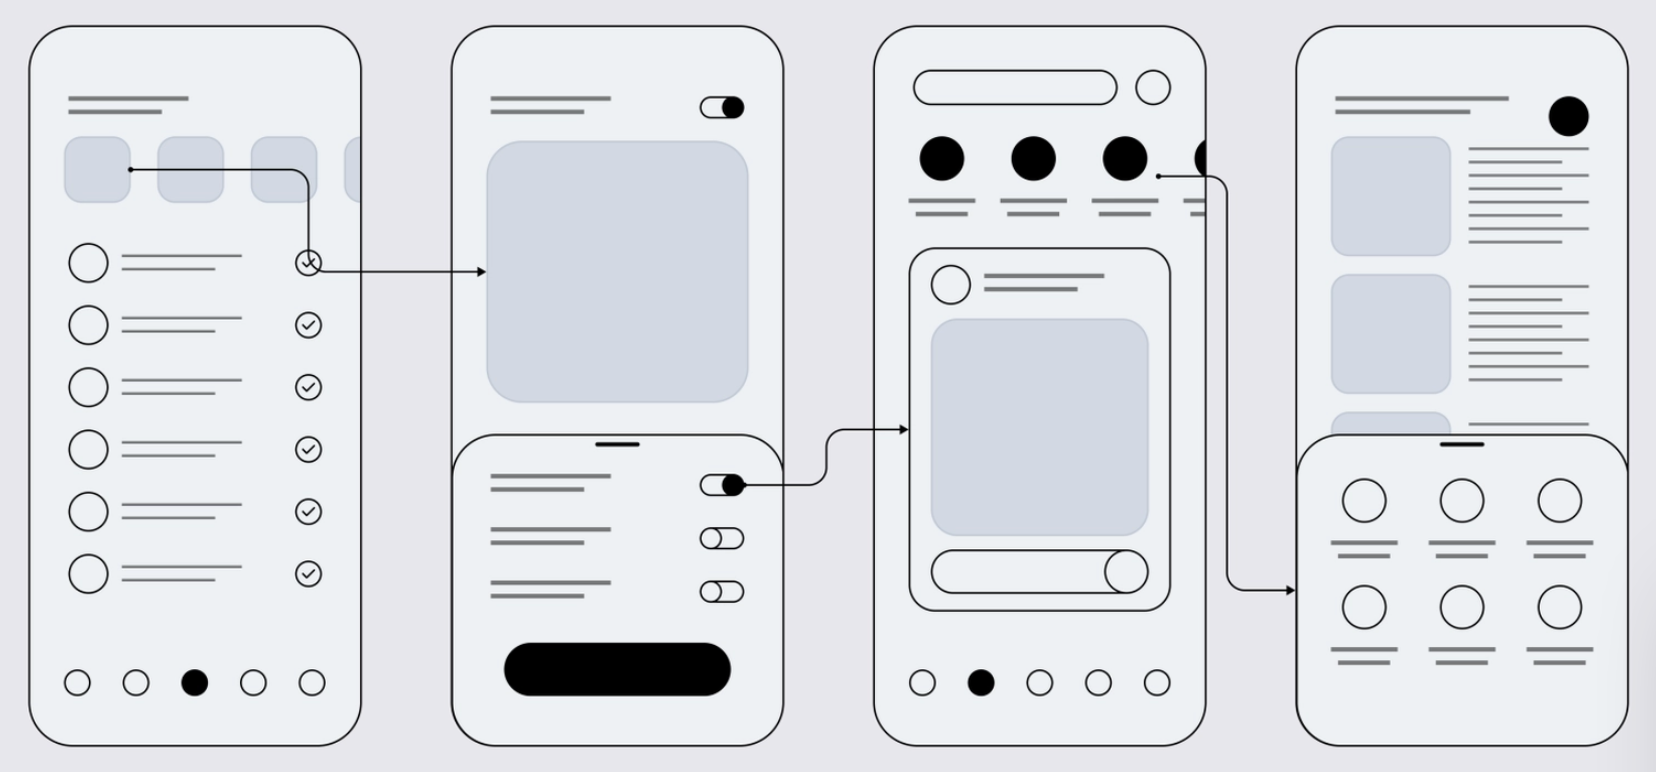
What we’ll build can be illustrated in the wireframe below. We’ll push three onboarding views to a navigation view stack, illustrated by the solid arrows. At the last onboarding step, upon clicking the done button, we’ll replace the root view with the home view. Finally, from the home view, it’ll be possible to “reset” the app and go back to the first onboarding view again. Replacements of the root view are illustrated with dashed arrows below.
Wireframe template by Martina Wolna
Onboarding and home views
Let’s quickly build the views, since they’re not really the interesting part of the exercise. Start by creating a new project in Xcode, and add a new view called OnboardingView1.swift. Replace it’s body:
struct OnboardingView1: View {
    var body: some View {
        NavigationView {
            NavigationLink("Next", destination: OnboardingView2())
            .navigationTitle("Onboarding 1")
        }
    }
}
Nothing extraordinary going on here, just a navigation link wrapped in a navigation view, which will push OnboardingView2 to the navigation stack. Duplicate OnboardingView1 calling it OnboardingView2. Copy the NavigatonLink part of the code, replacing OnboardingView2’s body, like so:
struct OnboardingView2: View {
    var body: some View {
        NavigationLink("Next", destination: OnboardingView3())
        .navigationTitle("Onboarding 2")
    }
}
Again, nothing in particular here, we are just just pushing the third onboarding view to the navigation stack when the next button is pressed.
Finally, create OnboardingView3.swift and add a done button, like so. We’ll fill in the action later on.
struct OnboardingView3: View {
    var body: some View {
        Button("Done") {

        }
    }
}
Build and run the app to make sure it works as expected. You should be able to navigate from onboarding view 1 to 3 now, pressing the next buttons.
The home view is similarly simple in design, so let’s get that out of the way. It’s basically a duplicate of onboarding view 3 with the button text changed from “Done” to “Onboarding”, like so:
struct HomeView: View {
    var body: some View {
        Button("Onboarding") {

        }
    }
}
Again, we’ll fill in the action later on. So, with the view code out of the way, let’s start looking at the more interesting part, the view router.
View router in iOS 13
So, after going through the 3 screens in the onboarding process, we’ll replace the navigation view and show the home view. First, let’s add a struct with the two routes our tiny app can have:
enum Route {
    case onboarding
    case home
}
Initial route
So, the idea now is to set up an asynchronous pipeline using Combine, to replace the root view of the ContentView with either the first onboarding view, or the home view. The ContentView will then automatically listen for changes and update its view.
Let’s start by adding ViewRouter.swift to our project.
Import Combine, and add a class conforming to ObservableObject. Next, we’ll add the Published property wrapper with the initial state, so that ContentView eventually will be able to listen for changes:
import Combine
import Foundation

class ViewRouter: ObservableObject {
    @Published private(set) var root = Route.onboarding
}
Next, let’s start using the view router, by adding it as a StateObject property wrapper to our content view. This allows us to switch over the two routes in the view’s body, displaying the correct view each time the state changes.
struct ContentView: View {

    @StateObject private var viewRouter = ViewRouter()

    var body: some View {
        switch viewRouter.rootView {
        case State.onboarding:
            OnboardingView1()
        case State.home:
            HomeView()
        }
    }
}
Test and run the app, and change the initial state to .onboarding to verify that it works as expected.
Combine pipeline
Next, let’s look at how we can update the route. This needs to be done in two different places: At the last step of the onboarding, and again at the home view.
To achieve this, we can set up a small Combine pipeline using a PassthroughSubject, that for now simply will pass the updated route on to our local route variable.
We’ll add a passthrough subject and a cancellable as local private variables, and set up the pipeline in the initialiser, like so:
private let routeSubject = PassthroughSubject<Route, Never>()

private var cancellable: AnyCancellable?

init() {
 cancellable = self.routeSubject
     .receive(on: DispatchQueue.main)
     .sink(receiveValue: { [unowned self] in self.rootView = $0 })
}
Let’s go through this code to understand what’s going on.
First, we create the passthrough subject and the AnyCancellable reference, which will shortly be used in the initialiser.
In the initialiser, we set up a subscription on the passthrough subject, making sure to receive on the main thread since we’re going to be doing updates to the UI. In the sink, we’re simply saving the passed route to our local root view.
Updating the route
To use our new pipeline, we simply need to pass a new route to the route subject. In the view router, create a new function:
func setRoute(_ route: Route) {
    routeSubject.send(route)
}
Using the view router
Finally, let’s use the view router. The view router is created in the content view, so it needs to be passed down to the onboarding and home views in order to be used. We could pass this is a variable from view to view, but since there’s several onboarding views, that becomes tedious.
Instead, we can leverage an EnvironmentObject property wrapper to pass it to an arbitrary child view.
var body: some View {
    switch viewRouter.rootView {
     case Route.onboarding:
            OnboardingView1().environmentObject(viewRouter)
        case Route.home:
            HomeView().environmentObject(viewRouter)
    }
}
And now, in OnboardingView3.swift, let’s use the view router:
struct OnboardingView3: View {

    @EnvironmentObject var viewRouter: ViewRouter

    var body: some View {
        Button("Done") {
            viewRouter.setRoute(.home)
        }
    }
}
As shown above, it’s enough to define the view router as an environment object to be able to use it. Then on pressing the done button, we set a new route, and that’s it! Going back to the onboard from the home view will be similarly easy:
struct HomeView: View {

    @EnvironmentObject var viewRouter: ViewRouter

    var body: some View {
        Button("Onboarding") {
            viewRouter.setRoute(.onboarding)
        }
    }
}
Test and run the app to verify that it works.
Now, this works fine, but if you try to restart the app, you’ll see that the view route is not persisted between cold runs. Let’s tackle that next.
Persistency
We want the view route to be persisted, so that we’ll be able to show the correct view when launching the app again later on. For simple data such as the enum we’re using, UserDefaults fits the bill perfectly. And we can leverage property wrappers once again, to make working with user defaults even easier. Let’s create a new property wrapper, called UserDefault:
@propertyWrapper
struct UserDefault<T> {
    let key: String
    let defaultValue: T

    var wrappedValue: T {
        get {
            UserDefaults.standard.object(forKey: self.key) as? T ?? self.defaultValue
        }
        set {
            UserDefaults.standard.set(newValue, forKey: self.key)
        }
    }
}
To use it, let’s make an extension on UserDefaults, defaulting it to .onboarding:
extension UserDefaults {
    @UserDefault(key: "route", defaultValue: .onboarding)
    static var route: Route
}
With this new property wrapper in place, we can now read and write values to UserDefaults like a normal variable, which is convenient.
Now, let’s use this value in our view router. Replace the value of @Published private(set) var rootView = Route.onboarding with UserDefaults.route. Then, when changing the route, we need to save the value back to user defaults. To do this, we can use our Combine pipeline that we set up earlier, and hook it on as a side effect using the handle events publisher:
init() {
    cancellable = self.routeSubject
        .receive(on: DispatchQueue.main)
        .handleEvents(receiveOutput: { rootView in
            UserDefaults.route = rootView
        })
        .sink(receiveValue: { [unowned self] in self.rootView = $0 })
}
Now we are saving the rootView to UserDefaults and we’re updating our local variable. This works fine, even though it’s not ideal two have two sources of truth. But we do keep them in sync, so it should be okay.
However, this has all been simplified in iOS 14 using the new App Storage property wrapper, which automatically syncs to User Defaults. So let’s take a look at that next.
View router in iOS 14
With the introduction of the App Storage property wrapper in iOS 14, we can throw up pretty much all of our Combine code from the last section. So, let’s start by deleting ViewRouter.swift. In the content view, let’s replace the view router with @AppStorage("route") var route = Route.onboarding.
Now, we need to make sure the our Route enum conforms to string to be able to use @AppStorage, so let’s do that right away:
enum Route: String {
    case onboarding
    case home
}
We still can pass the app storage variable as an custom environment value, but it requires that we define a key. Create a new file called EnvironmentValues+Custom:
import Foundation
import SwiftUI

struct RouteKey: EnvironmentKey {
    static var defaultValue: Binding<Route> =
        Binding.constant(Route.onboarding)
}
extension EnvironmentValues {
    var route: Binding<Route> {
        get { self[RouteKey.self] }
        set { self[RouteKey.self] = newValue }
    }
}
Now, back in the content view, we can then switch over the newly created app storage variable, passing it as a custom environment variable:
var body: some View {
 switch route {
 case .onboarding:
        OnboardingView1().environment(\.route, $route)
    case .home:
        HomeView().environment(\.route, $route)
    }
}
The final thing to update is the way we set the new value, let’s do that first in OnboardingView3:
struct OnboardingView3: View {

    @Environment(\.route) private var route: Binding<Route>

    var body: some View {
        Button("Done") {
            route.wrappedValue = .home
        }
    }
}
So, here we first create a binding to the route from the environment, and then we update its wrapped value upon clicking the button. You should do the same think in the home view.
Conclusion
As we have seen, making a view router has improved significantly with the release of the app storage property wrapper introduced in iOS 14. In iOS 13, it’s still doable, but requires us to set up a Combine pipeline, and we need to keep the route both as a local variable and a variable saved in UserDefaults. The source code for both iOS 13 and 14 can be found at my GitHub account.